
As you have noticed, posts have been halted in this little bloggy corner. The grateful blame goes completely and entirely to married man and my son Siah who, both being extraordinary web developers, have decided it was time for this girl to change things up a tad. And although both change and all things computer are not my best cup of tea, I have agreed to move on.
So change your feeds and dials and settings of sorts so you can follow along, for soon, very soon, a wonderful giveaway will be revealed. I can hardly wait to tell you about it....
You can now find this girl here: Paisley and Lace
5.14.2011
4.27.2011
My Friend Sally

Remember my friend Sally?

She came home with this girl quite a few seasons ago now,
but alas,
completely ignored
and rather neglected
she has sadly been.
Until now.
For this girl got a hankerin' for a dreamy dress
to wear this Easter Sunday,
which is rather a silly thing to hanker for
considering Easter Sundays
are known to be quite chilly in this corner of the world.
Infact, only one or two Easters
out of these 29 years we have been abiding
in our beach town so lovely,
can I remember being warm enough to dawn a springy dress to church,
but designing a dress
I determined was a must
for this girl.
A dressy dress
made from a sheet of course
that can be worn with jeans
and a sweater
and a wool jacket
and boots.
Although some would say that doesn't really work,
and perhaps some did,
this girl was pleasantly pleased,
my dear one via a phone picture loved it,
which is my favorite compliment, indeed,
and married man didn't take a hit to the wallety wallet.

Being my dear one's first Easter away,
making a little something for her was a must!
This girl used Anna Maria Horner's Flirting the Issue Skirt.
Sending it sneakily in the mail
to her home far away,
made this slightly sad momma
feel much, much better, indeed.
This girl is always amazed
at how thinking of and loving others
brings joy to ones heart
when it might be a wee bit weepy.

And back to my friend Sally...
she was surprisingly a help.
For although her waist is designed for women of the 50's,
who it seems had itsy-bitsy waists,
I found laying the pieces over her shoulders and
around her neck
to be much more useful
than my flat,
curveless,
figureless,
kitchen table.
So this girl
with her friend Sally,
will soon embark upon

4.25.2011
A Lovely Summer Dress Challenge
Last year I participated in the Spring Top Week over at Made by Rae.

I made these little lovelies:


Again this great little competition has begun. Check it out and join in on the fun if you can!
* * * * *
Oh, bother. This girl has two little problemy problems with entering this lovely grand yearly contest. Problem one - As can be seen from the above photos, this girl just doesn't really wear 'tops', but rather dresses that one wears with jeans or leggings. And problem two - school is not out so this girl is still busy homeschooling two home-remaining totally awesome students and teaching a few classes for other homeschoolers at CFT.
So what is one to do when one cannot join in on a creative party filled with fun and fabulous sewists? This girl decided she must try a party of her own. A dress party! A summer dress party! A celebration of creative fashion goodness!

So get those creative juices flowing! Dream. Make a pencil sketch, or begin the hunt for that perfectly dreamy dress pattern, then embark upon the search for the perfectly 'you' fabric. Then sew away, my friend! If you are anything like this girl, it all takes time, but no worries. We will have till August 31. But if you have bunches of free time on your hands, head on over to Made by Rae and join her fun contest, then come on back this way, to make a lovely summer dress.
Dresses may be entered any time between now and August 31. I will have a few of my very fashionable friends be our friendly judges. And there will be prizes of course!
Here are some simple guidelines:
1 - Put a picture of your newly made creation on the Lovely Summer Dress Challenge flickr group, with the link to your specific blog post where you tell your lovely dress-story.
2 - Link back to my blog in your own post. If your heart so desires, grab my Lovely Summer Dress Challenge button and add it to your blog page.
3 - Spend a goodly amount of time strolling through our flickr group. Get inspiration. Meet new friends. And leave happy little comments. We all love words of praise and encouragement.
If you would like to contribute prizes to this grand soiree, please email moi at tinaratliff@gmail.com
Happy sewing, friends!
* * * * *
Here's the ever so lovely button thanks to youngest boy:
and the html stuff to make it work - thanks to married man.
4.21.2011
Wednesday's Bread - Tartine Bread with Hummus

Today this girl made her family another Basic Country Loaf from Tartine Bread by Chad Robertson. Being the second time through, a much more easy process it happily was. The leaven was more developed and active since feedings have been daily. This family of silly boys tease that it has become our new family pet and claims that this girl talks to it. I don't. But, this girl does care for it quite particularly, and is beginning to wonder what one will do with my little lovely when a vacation is someday embarked upon.
Today's bread was served with Hummus, a family favorite.
Here is this girl's recipe for Hummus:
Place 2 cans garbanzo beans, rinsed and drained, in a Cuisinart:

Add the juice of 2 - 3 lemons:

2 cloves garlic:

1 teaspoon kosher salt:

1 tablespoon cumin:

1/4 cup sesame seeds, ground:
If sesame seeds are lacking in the pantry, tahini or even peanut butter will do nicely.

A few dashes cayenne pepper:

2 tablespoons extra virgin olive oil:

Blend in food processor until smooth, adding a bit of water as needed.
Enjoy with fresh bread, or even carrots and tortilla chips!
4.18.2011
These are my days...
Sometimes it seems as if joys
are covered over with the heavy cloth of life's struggles,
blinding one from seeing the goodness all around.
I forget to enjoy,
to look up,
to breathe,
to smile
and enjoy this day,
my awesome children,
and my dear husband.
I am missing it.
Missing life.
My life.
My wonderful, simple, sweet life.
Lord, help this girl to notice the many graces in this life.
My wonderful, simple, sweet life:
A whole-family-all-together dinner:


These two boys building a garden:


and a waterfall made with clay pots
which this momma preferred over last week's project
of exploding soda bottles filled with dry ice.

Afternoons at the beach together:


4.16.2011
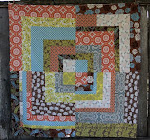
Lazy Girl Quilt Along - Square One
Square one. Done.
I love how ginormous it is:

Neighborhood dog and square one.


This girl is determined to build this scrappy quilt no more
until the next grand gathering of lovelies in two weeks
so if you are joining us from lands so far away,
plenty time is at hand
to gather colorful scraps and join in!
Join us in the lazy girl quilt along Flickr group for sharing progress.
4.13.2011
Wednesday's Bread - Tartine Bread

Tonight we listened to the song of bread together.

That is what Chad Robertson of Tartine in San Francisco calls the faint crackling sound heard as bread is cooling. This was my first loaf of bread made from his most amazing and beautiful book, Tartine. Never has this girl made a loaf quite like it. We were all truly shocked at how authentic it looked and tasted. I highly recommend this bread book. It has many, many detailed and artful pictures showing every step along the way, making it quite doable. It's a must have!
4.12.2011
Improv Single Lazy-Girl Quilt Tutorial
Yes. This girl, being up way too late
are in my room chatting about all things computer,
thinks Lazy Girl Quilt,
a more appropriate name,
and quite funny at this wee hour.
A dandy name for the soon to be embarked upon quilt!
and this girl keeps promises given, so here we go...
This tutorial is a rather simple improv version of a Single Girl quilt. Several lovelies will be joining this girl in my homey home every other Thursday evening to create this quilty goodness. An olde fashioned, yet quite modern, quilting circle we will be. Lots of fun, and maybe some chocolate and wine, we will have. Here are the detaily details if you would like to do the same in your own homey home. After this week, I will start a flickr group for us to show all our quilty goodness.
I have worked 3 sizes. Again, this is my own improv version:
Each full circle is a whopping 22" square.
Queen - 88"x110"
it will be 4 circles by 5 circles
Throw or Lap quilt - 66"x88"
it will be 3 circles by 4 circles
Baby - approx 44"x44"
it will be 2 circles by 2 circles
I highly suggest using a Kona Cotton for the solid colored fabric. They are consistent in color if more of the same hue is needed later. This girl tends to buy things in smaller increments. It seems that each complete circle takes about 2/3 of a yard. I am using 'bone' by Kona for all of the solid. Another lovely is using different colors for each circle. We will only purchase fabrics for the quilt top at this time. I usually wait until I have completed the top to choose the back, binding and batting. I do not pre-wash my fabrics.
To begin our improv version, cut the desired quarter-of-a-circle shape out of a 11" SQUARE piece of paper. Mine is not quite a true circle, The 'corners are pushed out a little, making it a square-ish circle. We will use these 3 pieces as a template, simply adding 1/2" around all edges to allow for seam allowance. You will see better as we go along. I promise.

We will begin by making our first quarter circle piece:

And trim, leaving 1/2" for seam allowance:

Here is how:
To make this curved piece, begin by arranging scraps in the order you would like:

Join the first 2 fabrics, making sure they are plenty wide:

Open up and press flat with your fingers.
Lay the template over and see where the next shape should go:

Add on the next piece. Notice how I angle them to get them in the shape of the template:

Continue attaching random widths at angles:

When your curved strip is wide enough, go to the ironing board, and press it:

Pin on the template:
Cut curved strip, leaving 1/2" seam allowance all around:
Now pin your other 2 templates to your solid fabric.
I used a white for most of this tutorial.
I used a white for most of this tutorial.
Cut, leaving 1/2" for seam allowances:

Here are the 3 pieces so far:

Next I folded my pieces, marking the 1/2 way point on both edges of the curve, and on each of the curved lines of the white fabric:


You can see my markings at the fold a little better here:

Pin together at the center point and the 2 edges:

Now, go pin-crazy if you like, easing the curve as you go.
Stitch 1/2" from edge, easing the fabric as you go along.
Open up and admire your improv goodness:

Now we will sew on the remaining shape.
Match the center points and the edges as we did previously:


Press, then you can begin joining them together as they are completed:

(After making 2 quarter circles, this practical momma decided white pillows in a house full of fun loving boys probably would not be the best of ideas. I actually ripped out the white and switched it for grey.) Here you can see that I did each step, four at a time. I don't know why. But that is what I did. You can do them one at a time if you like.

Finally, join all four quarter circles, right sides together.
You can see here how I pressed the seams in opposite directions so the center point is not too bulky.


Here you can see the 4 quarters joined together:

After a bit of colorful hand-stitching,
this became a simple pillow for folks resting on our couch,
...or little ones rolling on the floor...
Now I will begin my Lazy-Girl quilt
with the company of some lovely ladies.
Subscribe to:
Posts (Atom)


